Monday, September 12, 2016

Return Kth to Last

Implement an algorithm to find the kth to last element of a singly linked list.

If we knew the length of the linked list, then we could just subtract k and we would move a pointer length-k times.

Here, I think the best way would be to just iterate through the linked list with two pointers. The two nodes start on the head of the linked list. The first pointer would go ahead k steps, and then both would move ahead until the first point touches the last node. The next node that the second node stops at will be out kth to last node.

This would take O(n) time since we have to go through all the elements of the linked list, and O(1) space.

Here's what I have:

We first create the structures for a linked list
#include <stdlib.h>
#include <stdio.h>

struct node{
int data;
struct node* next;
};

struct list{
struct node* head;
};
Then we make some linked list making functions
struct node* create_node(int data){
struct node* new_node = (struct node*)malloc(sizeof(struct node));
new_node->data = data;
new_node->next = NULL;

return new_node;
}

void add_node(struct list* llist,int data){
struct node* new_node = create_node(data);
new_node->next = llist->head;
llist->head = new_node;
}
The star method of this question! Assuming a valid k and linked list, we get two pointers, move the first k times, and then move both pointers until the first pointer reaches the end of the linked list.
int kth_to_last(struct list* llist, int k){
struct node* tmp1 = llist->head;
struct node* tmp2 = llist->head;

int i;
for (i=0;i<k+1;i++){
tmp2 = tmp2->next;
}
while(tmp2->next != NULL){
tmp1 = tmp1->next;
tmp2 = tmp2->next;
}

return tmp1->data;

}
Then we create a linked list for some testingggg
int main(int argc, char* argv[]){
struct list* new_list = (struct list*)malloc(sizeof(struct list));
new_list->head = NULL;

int i;
for (i=20;i>0;i--){
add_node(new_list, i*2);
}

for(i=0;i<19;i++){
printf("%ith item: %i\n", i+1, kth_to_last(new_list, i));
}
}

Thursday, August 18, 2016

Binary Search


Binary search is one the simplest search algorithms(most are pretty simple) to implement. However, first it assumes an important property of an array that isn't always true; the array is sorted. This search is based on the number of elements(length), and we fold the array in half each time, which makes search time logarithmic.

First, you see in the diagram above that the list is already sorted. Next, we label the first index as the lowest number(LO), the last index as the highest number(HI), and the middle index as the index between lowest and highest(MID). Keep in mind that these are just markers for indices and we aren't moving any of the array elements around.

In the diagram that's searching for the number 16 and we realize that the number 16 is smaller than the number in index MID. As a result, we move the high index right before the mid index, and we reorganize the mid index as the middle of lo and hi again. This is what cuts the array in half, and in another half every time it checks MID. The resulting indices is represented in the second row of the diagram.

The last row of the diagram, just shows that when we check MID again here we find that it matches our search number, and thus re return the MID index and we are doneeeeee!!!!

In the case that the number we are searching for is higher than MID, then we'd move LO right after MID and re-position MID. Also, in the case that we don't find any numbers, we'd just return -1.

We repeat these steps several times, folding HI and LO in halves until we've either found our number or we've looked through all the possible index elements.

Here's how it would look in java:
import java.util.Arrays;

class BinarySearch{
.
.
.
public static int rankIndices(int key, int[] a){
//assume here that the array is sorted already
int lo = 0; //index 0 is lowest
int hi = a.length - 1; //and the last index is highest
while(lo <= hi){ //stop when hi and lo have become the same index number
int mid = lo + (hi - lo) / 2; //find the middle of hi and lo
if (key < a[mid]) hi = mid - 1; //key is between mid and lo, move hi before mid
else if (key > a[mid]) lo = mid + 1; //key is between mid and hi, move low after mid
else return mid; //The middle number is the number we look for
}
return -1;
}
}

And here's some python:
def binarySearch(key, a):
## assume that the array is already sorted
lo = 0
hi = len(a) - 1
while lo <= hi:
mid = lo + (hi - lo) // 2 ##postion mid, integer division
if key < a[mid]:
hi = mid - 1 ##key is between mid and low, move hi before mid
elif key > a[mid]:
lo = mid + 1 ##key is between mid and hi, move lo after mid
else:
return mid ##mid is where our number resides
return -1 ##number is not found


print binarySearch(2, [0, 1, 2, 3, 4, 5, 6, 7]) ##just a test

Sunday, April 17, 2016

Relational Algebra - An Intro of it's Use and Operators


Consider the following database scenario:
You are planning a high school graduation party for the school. You keep data on those who have registered to be present on that day. We have students(S), teachers(T), staff members(SM), parents(P), and siblings(C) of the students, followed by relatives(F), and a list of registered people for the party(R). We also have information about food allergies(A). If we were asked to find out the group of people who is a 25 years old or older and a parent of a student who has a peanut allergy, what would you query?

SELECT S.name
FROM S
WHERE S.allergy='peanut' and S.parent=
               (SELECT P.name
                FROM P
                WHERE P.age >= 25)
As we can see here this is not the simplest query. Imagine if we had to query for something way more complex than this. Would you sit there and try things out until you got the right query? Would a database always have someone behind it entering queries? Not always(Probably not). It can be done of course, but there's a better solution for this.

Relational Algebra: relational algebra is a way of expressing relations. Just like algebra is a way of expressing numbers and their relations, relational algebra is a way of expressing things in a database with their set of operators. It can also be used to describe constraints of a database, though we'll elaborate on that in another post.


Relational Operators: relational operators are analogous to arithmetic operators; they operate on a certain operand and describes the operands' relationship to each other. Below we will jump into some of the basic operators.

1. Selection(σ): Like in SQL queries we are selecting a subset of rows from a relation(operand)
2. Projection(π): Keeps certain column(s) of a relation, I don't think this has an SQL counterpart
3. Cross-product(×): Also called Cartesian product. This takes relations and combines them
4. Join(⋈): Connects two relations with some sort of condition
5. Set-difference(−): an existing tuple(s) in one relation but nonexistent in another relation
6. Union(∪): Tuples that exist in one relation OR another relation. Realize that the "or" I'm talking about is logical or.
7. Intersection(∩): Tuples that exist in both of two relations
8. Renaming(\rho): renames a relation or an attribute.
Operator Examples:
1. Selection(σ) & Projection(π): All of those who have a peanut allergy from the student list(S)
πS.nameallergy='peanut'(S))

3. Cross-product(×): All of those who have peanut allergy and are a student or teacher
πS.nameallergy='peanut'(S × T))

4. Join(⋈) All of those who have peanut allergy and are a student or teacher
πS.nameallergy='peanut'(S ⋈ T))

5. Set-difference(−): find the students who have an allergy but did not reserve a place for the party
πS.nameallergy='peanut'(S)) - πS.name(R)

6. Union(∪) & Renaming(\rho): The list of students and teachers that have a name of "Sara"
πR.nameR.name='sara'(\rho(R , (S ∪ T))))

7. Intersection(∩) & Renaming(\rho): The list of people who's name is "sara" and is both a parent and a teacher
πR.name(σ R.name='sara' (\rho(R , (P ∪ T))))


Friday, March 11, 2016

MySQL Queries and commands


In this post I hope to go through some MySQL commands that would help users get started and used to using it. Remember that semicolons are default used to show end of command/queries.

Creation/Deletion Commands

USE <database name>:
This is used to enter an existing database.

CREATE DATABASE <database name>:
This is used to create a database.

CREATE TABLE <table name> <name of variable, variable type>:
This is really similar to database creation, although it has many more entries for each attribute. Here are some commonly used ones:

  • CHAR(N), where N is length between 1-255. Default is 1
  • VARCHAR(N), where N is length between 1-255. Unlike CHAR, you must define a length.
  • INT, an integer entry. The number should be between -2147483648 and 2147483648. If you need a bigger number, you can use
  • BIGINT the integer max depends on signed or unsigned.
SHOW TABLES:
Shows all available tables in a database

SHOW DATABASES:
Shows all existing databases in MySQL

DESCRIBE <table name>:
This shows how you've defined the table, what variables and types.

DROP TABLE <table name>:
This totally deletes the table, if it exists of course.

DROP DATABASE <database name>:

This deletes an existing database

Query Commands

SELECT * FROM <table name> WHERE <some condition>:
Select *  means it finds some table and return everything. If you want to find something specific you would do SELECT <attribute name> FROM <table name>  and if you want to return pairs of things you can specifiy the attributes with commas.
Ex.  SELECT name, age FROM attendees WHERE age > 20;

FROM describes where you are searching/querying.
WHERE is specifying conditions, you can specify several conditions in separated AND or OR.

AND:
The and keyword is used to specify that the combined conditions must all be satisfied.
Ex.  SELECT name, age FROM attendees WHERE age > 20 AND age < 30;

OR:
The or keyword is used to specify that one of the combined conditions must be satisfied.
Ex.  SELECT name, age FROM attendees WHERE age > 20 OR age < 10;

These are just the few basic commands/queries that you can do, and I hope that this helps you get started with building a database! I also plan to publish a post that goes into more queries, since most database management concepts are about these queries.

Monday, February 29, 2016

Breadth-First Search


Breadth-first search is a search algorithm to find something in an tree. This search algorithm utilizes a queue to keep track of all the nodes that the algorithm will explore. If you're not sure what a queue is then you should take a look at it here.

What basically happens:
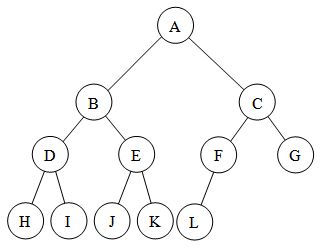
The search algorithm starts at the root node(A), and looks at each node of its children before going on.

What specifically happens:
Let's say that the goal is to find E.
The search tree starts at the root node(A) added into the queue then popped, and adds it's children into the queue. If the node it is at is not a goal, it enqueues its children into the queue. If it is the goal then the algorithm returns and stops. Here are some of the steps:

1. We start with A dequeued from the queue. Since A is not the goal and it has children, A's children are enqueued. Queue = [B, C]

2. B is dequeued from the queue and its children are enqueued. Queue = [C, D, E]

3. C is dequeued from the queue and its children are enqueued. Queue = [D, E, F, G]

4. D is dequeued from the queue and its children are enqueued. Queue = [E, F, G, H, I]

5. E is dequeued from the queue and it is our goal, so we stop.

Think about if we are searching for M. What would our path be and what would happen?

Why don't we need an explored list compared to Depth-first algorithm?
Because we search everything level by level, there is no need to keep track of explored nodes, whereas Depth-first has to go back up the tree.

Friday, February 26, 2016

Depth-First Search

Depth-first search is a search algorithm to find something in an tree. This search algorithm utilizes a stack to keep track of all the nodes that the algorithm will explore. If you're not sure what a stack is then you can read about it here.

What basically happens:
The search starts at the root node(A), and continues to travel down until it reaches a leaf node. Once it hits a leaf node, it goes a step until it can travel downwards again. This continues until it has either found what it was looking for, or until it has explored all of the nodes and found nothing. The path happens this way: (A, B, D, H, I, E, J, K, C, F, L, G)


What specifically happens:
Let's say our goal is to find G.
The search starts with the root node(A) and pushed into the stack, and continues to travel down until it reaches a leaf node. A leaf node is a node that does not have any children. At every step it checks to see if the node has already been explored. If it has been explored, it is simply ignored and continues looking in the stack. If the node has not been explored, it adds any children(that have not been explored) into the stack and adds itself to the explored list. If it hasn't found the goal, then it continues to search until it has found the goal or that the tree is all explored. Here are some of the steps:

1. A goes down B, D, and stops at H.  Explored list = [A, B, D, H]  Stack = [C, E, I]

2. H is a leaf so it doesn't add any children to the stack, I is popped off and added to the explored list.
    Explored list = [A, B, D, H, I]  Stack = [C, E]

3. I also doesn't have any children to add to stack, E gets popped off. It's added to explored and its children added to the stack.
    Explored list = [A, B, D, H, I, E]  Stack = [C, K, J]

4. J is popped off the stack. Because it is a leaf no children are added to the stack. Same thing happens with K.
    Explored list = [A, B, D, H, I, E, J, K]   Stack = [C]

5. C is popped off the stack and any of its unexplored children are added to the stack.
    Explored list = [A, B, D, H, I, E, J, K, C]  Stack = [G, F]

6. F is popped off the stack and, any unexplored children added.
    Explored list = [A, B, D, H, I, E, J, K, C, F]   Stack = [G, L]

7. L is popped off the stack and there are no children to add to the stack.
    Explored list = [A, B, D, H, I, E, J, K, C, F, L]   Stack = [G]

8. G is popped off the stack and because our goal was to find G, we stop our search.

Imagine that there is a search for M. What would happen? The algorithm should return something that signifies nothing was found.

Why do we need an Explored list?
The reason that we would need an explored list is to prevent already traversed nodes from being rechecked, and prevent its children from being added back into the stack. Without the explored list the algorithm would end up in a loop forever.
Just like looking for something in the grocery store, you wouldn't want to go back to an aisle you already looked in, because you remember that you've looked there already.

I hope this clears up any muddy ideas you have about this search algorithm. Feel free to let me know if I've made any errors, grave or not.

Friday, February 5, 2016

Database Concepts - A Short Post about the Relational Database Model

via Wikipedia


Relational Database Model:
The relational database model, different from the entity relation model, shows specific data and information about a database table. A relational database model contains two parts: An instance, and a Schema.

Schema:
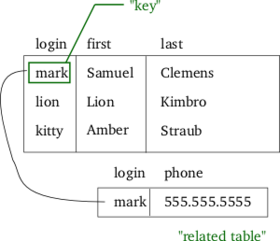
The schema is specific name of the relation, or the name of each column. If you think back to the Entity-Relationship Diagrams, there are names that have relationships to each other, these names would be the part of the schema. In the above picture, the schema would be the part that says "login", "first", and "last."

Instance:
The instance are the rows of data that pairs with the schema. In the above picture, the instance would be the rows of names.

Relations:
As you can see from the image above, the specific row of information for "Mark" is linked to another table that contains the specific key's phone number. This, is what the Entity Relationship Diagram has drawn out; the connection between one login key to a foreign key.

Usage:
With the Relational Database, we can use query language to query for data. Although our queries can be efficient, the DBMS is mostly responsible for making queries efficient.

Wednesday, February 3, 2016

Setting Up MySQL


Hi Everyone!

I know I haven't been posting much these past few months, I was busy with many other things and I decided to take a breather with blogging. However, things have cleared out of my way now, and I will start again with posts.

Installing:
For Linux users, type the following into your command line:

shell>sudo apt-get install mysql-server
shell>sudo apt-get install mysql-client

For Mac and Windows users, you have to download the installer here. Make sure you check 32 or 64 bit! Follow the steps that the install gives, and you should be fine!

Using MySQL:
To start up MySQL:  type the following commands in the terminal:
shell>mysql -u root -p
It would ask you for your password, since you need to be the root user. The installation should ask for you to set a password for MySQL, which is optional. If you do not wish to set a password, you can just click enter when it prompts you to type in a password.

If you did not set a password for MySQL, you can disregard the "-p" part. You can also just type it and click enter when it asks for a password. If you get in, you should see something like this:
Welcome to the MySQL monitor.  Commands end with ; or \g.
Your MySQL connection id is 1
Server version: 5.6.27 MySQL Community Server (GPL)
Copyright (c) 2000, 2015, Oracle and/or its affiliates. All rights reserved.
Oracle is a registered trademark of Oracle Corporation and/or its
affiliates. Other names may be trademarks of their respective
owners.
Type 'help;' or '\h' for help. Type '\c' to clear the current input statement.
mysql>
For Windows users, here's the way to start it up. I haven't tried this but I hope it helps.

To create a database: type the following in the MySQL command line:

mysql>create database database_name;

Notice here that you need a semicolon to show that you're done talking. We'll see later how that semicolon can be changed to something else.

To go into a database: type the following in the MySQL command line:

mysql>use database_name;
type in "mysql --help" in you're computer terminal to see many, many other commands.


Changing MySQL Password:
In order to change your MySQL password you will need to log onto MySQL first. After that you type the following:
mysql>grant all privileges on *.* to root@localhost identified by "new_password";
Here, the new_password should be in the quotes.

Changing the Terminator Symbol:
The semicolon at the end of each command is usually called the terminator, which tells MySQL that you're done with a statement. But what if you wanted to paste a big chunk of commands? Or paste in a function? You can change the terminator symbol before you paste code, and change it back to semicolon afterwards. Here's how to change it:

mysql>DELIMITER YOUR_TERMINATOR

example: mysql>DELIMITER done

In this example, assuming you don't have the word "done" in your code, will end your set of commands when it find the word "done." To change it back to semicolon you would do the same except with a ";"

That's it! Pretty Simple huh? If you have any problems look it up, many people may have the same problem. You can also feel free to post a comment here, and please do so if my post here helped you! I really appreciate knowing that I have helped! 'Til next time.


*It also seems that the spacing of this post is really odd, I'm trying to fix it but I haven't figured out the cause so far.

Friday, December 4, 2015

Database concepts - ER Diagrams (Continued)


So, in the last post I went over a little about how things are represented in an ER diagram, as well as the reasons to why using an ER diagram is helpful to design a good database. In this post, we'll elaborate on specific rules and guidelines that should be followed ad considered when creating an ER Diagram along with more information on relationships. Let's get started!

The basic setup of the ER diagram is formed in the first post, but there are Integrity constraints that need to be established.
Entity Integrity:
The entity integrity constraints states that a primary key of an entity cannot be NULL. NULL means that the value is unknown. The reason behind this is that specific rows of an entity is identified by the primary key(previous post), and if there is no primary key, then there is no way to identify it.

Referential Integrity:
The referential integrity constraint states a specific constraint between two tables. The primary table's records must exist in order for another table to reference that record.

For example, John sells a used car to Adam. The license of this car is 00A154.
In the Car table, there would first exist an record of this car:
    (License, Year, Model, Manufacturer) --> (00A154,  2014, Civic, Honda)

In the Sells table, there would then exist an entry:
    (Salesman, Client, Car) --> (John, Adam, 00A154)

1. If John were to change this record in table Car to (00B154, 2014, Civic, Honda), the Sells table would not be able to locate a record of 00A154.

2. If John were to delete the record in table Car, the Sells table would also not be able to locate a record of 00A154.

3. If John accidentally inserted the Sells record incorrectly say (John, Adam, 00B154), then when the Sells table try to locate Car 00B154 and it's information, the records would not be able to find it.

4. However, John can insert the Sells record as (John, Adam, NULL).

Foreign Integrity:
Foreign integrity constraints help solve the first two problems we have with the Referential Integrity Constraints.

Cascade Update:
Any time the primary table's record is changed, anything that references it must also be changed. That way there would not have mismatching records when we try to locate the reference.

Cascade Delete:
Any time a primary table's record is deleted, anything that references it must also be deleted. That way there would not have unfound records.


Relationship Constraints: There are key constraints, One-to-One, One-to-Many, and Many-to-Many. Then, there are participation constraints.

One-to-One: One to one means that an entity can at most be related one entity. For example, a man can be married to one woman, and vice versa. Sometimes there would also be specific ranges on the line specifying the relationship as [1:1]. This would be denoted by an arrow:

Man --> marries <-- Woman

One-to-Many:  Let's say in a case that a man can marry many women, but a woman can only marry one man. Sometimes there would also be specific ranges on the line specifying the relationship as [1:N]. The relationship would be a One-to-Many, expressed as the following:

Man -- marries <-- Woman

Many-to-Many: Many-to-Many are represented like the diagram above, just a thin line.

Mechanic -- Repairs -- Car

Participation Constraints: If we want to create a database where everyone must be married, then we would have a participation constraint. The arrows are still present to represent the One-to-One relation, and the line is thickened to show that records MUST be married couples.

Man --> marries <-- Woman